

The AndyPi (Meme) Coin! Full guide to creating your own cryptocurrency token on the Solana blockchain
This guide is based on the excellent video by Network Chuck (https://youtu.be/L4ASwqLZVV0?t=397). I’ve documented actually minting a real token with real money, and clarified the setup in more detail. I’ve also used the real token addresses so you can see exactly what it looks like live on the Solana blockchain – don’t use these addresses yourself, use your own if you are following the guide! I’ve used around £50 of Solana to do this tutorial, and note there is zero financial benefit to this – just for fun!
1. Software Setup
The whole process will be completed on the command line, with the solana CLI. This can be installed and run via docker, to make installation easier and more portable. The dockerfile is slightly different from Network Chuck’s version, as there were a couple of slight differences to make it work on MacOS (ref: https://solana.stackexchange.com/questions/17903/cant-install-solana-cli-from-docker-on-a-mac):
dockerfile:
# Use a lightweight base image
FROM --platform=linux/amd64 debian:bullseye-slim

# Set non-interactive frontend for apt
ENV DEBIAN_FRONTEND=noninteractive

# Install required dependencies and Rust
RUN apt-get update; apt-get install -y \
curl build-essential libssl-dev pkg-config nano \
curl --proto '=https' --tlsv1.2 -sSf https://sh.rustup.rs | sh -s -- -y \
apt-get clean; rm -rf /var/lib/apt/lists/*

# Add Rust to PATH
ENV PATH="/root/.cargo/bin:$PATH"

# Verify Rust installation
RUN rustc --version

# Install Solana CLI
RUN curl -sSfL https://release.anza.xyz/stable/install | sh && echo 'export PATH="$HOME/.local/share/solana/install/active_release/bin:$PATH"' >> ~/.bashrc

# Add Solana CLI to PATH
ENV PATH="/root/.local/share/solana/install/active_release/bin:$PATH"

# Verify Solana CLI installation
RUN solana --version

# Set up Solana config for Devnet
RUN solana config set -ud

# Set working directory
WORKDIR /solana-token

# Default command to run a shell
CMD ["/bin/bash"]
Use this dockerfile to build & enter the container:
docker build -t heysolna
docker run -it --rm -v $(pwd):/solana-token -v $(pwd)/solana-data:/root/.config/solana heysolana
2. Create a Solana account / wallet for minting tokens.
First create a Solana account wallet. This command searches for a new wallet (here we specify what the account id starts with, and find 1 valid id). This can take a little time as it has to generate a random keypair and find a public key starting with what is specified.
solana-keygen grind --starts-with dad:1
This will SAVE the private key to:
~/.config/solana/id.json
and DISPLAY the public key:
dadqnVqUBAGT7WfpWb5NcfpCiSfCHKk1RWHCiXaUkSD
(This is the main wallet that will hold my token and also can send / receive Solana)
Set the account just created as the default keypair:
solana config set --keypair id.json
To change to devnet (free for testing):
solana config set --url devnet
To change to mainnet (costs real money!):
solana config set --url mainnet-beta
To verify your current Solana CLI config and see which net and which account you are using:
solana config get
3. Get some Solana!
In order to mint new tokens on the Solana blockchain, Solana tokens are needed.
On devnet, these can be obtained for free like so:
solana airdrop 2
On mainnet, Solana needs to be bought from an exchange and send it to the wallet public address / key created in step one.
To view the balance in the current active wallet:
solana balance
4. Create the token (mint account)
To create a token, another keypair must be created in the same way – this will become the official token address (the factory to mint the token). Although it’s using the same command to create a keypair, it’s what is done next that determines what this address becomes:
solana-keygen grind --starts-with mnt:1
starting with mnt so to help show it’s the mint address for the new token.
Again this will SAVE the private key to a file, and DISPLAY on screen the public key:
mntVoHy1UaF8e3Wkr3yMT2NXx3L4tYnUQARycNDg87H (This is the AndyPi Coin address)
Now a token can be created. The program-id is a specific fixed id (of 2022) that allows token creation with metadata, which we enable. Chosee 9 decimal places for the token (same as Solana), and finally add the mint account just created:
spl-token create-token \
--program-id TokenzQdBNbLqP5VEhdkAS6EPFLC1PHnBqCXEpPxuEb \
--enable-metadata \
--decimals 9 \
/solana-token/mntVoHy1UaF8e3Wkr3yMT2NXx3L4tYnUQARycNDg87H.json
5. Upload Metadata
Now, upload the metadata for the token, with the name (AndyPi Coin), symbol (ANDYPI) and the icon (should be square, either 512×512 or 1024×1024 and less than 100kb). The metadata should be in a permanent web accessible location, I chose Github to host the image and the meta data in JSON format, but note NOT to use a filename extension!
Upload image & metadata andypi_coin_metadata.json online (permanent URL, token adress without .json). The metadata file contents are:
{
"name": "AndyPi Coin",
"symbol": "ANDYPI",
"description": "Trumps all other coins",
"image": "https://raw.githubusercontent.com/andy-pi/coin/refs/heads/main/andypi_logo_512x512.jpg"
}
To initialize this metadata and add it to the token, run the following command:
spl-token initialize-metadata \
mntVoHy1UaF8e3Wkr3yMT2NXx3L4tYnUQARycNDg87H \
"AndyPi Coin" \
"ANDYPI" \
https://raw.githubusercontent.com/andy-pi/coin/refs/heads/main/andypi_coin_metadata
The token (actually any token in this tutorial!) can be viewed in the Solana blockchain explorer online which should show the metadata just uploaded:
https://explorer.solana.com/address/mntVoHy1UaF8e3Wkr3yMT2NXx3L4tYnUQARycNDg87H
6. Mint some tokens
To mint some tokens of the token type just created, a token account is required. Each Solana wallet will have individual accounts for each token it has.
This quickly becomes confusing, so here’s a recap of our accounts so far:
A. Main Wallet (Part 2)
B. The Token definition itself (also called mint account) (Part 4)
C. Token account (this part)
This command creates a token account inside the token definition account:
spl-token create-account mntVoHy1UaF8e3Wkr3yMT2NXx3L4tYnUQARycNDg87H
Now the token account has been created, tokens can be minted – how about a cool million to start with! This can be any amount and can be done multiple times. Note: only the ‘dad’ account that created the token can mint them!
spl-token mint mntVoHy1UaF8e3Wkr3yMT2NXx3L4tYnUQARycNDg87H 1000000
The new tokens can be seen with the following command:
spl-token accounts --owner dadqnVqUBAGT7WfpWb5NcfpCiSfCHKk1RWHCiXaUkSD
7. Transfer tokens
To transfer tokens to another Solana address, use the following command. Allowing an unfunded recipient means that this will send the token even if the recipients’ Solana address doesn’t have its own account for the AndyPi token (but this will cost extra Solana from this sending account to set that up).
spl-token transfer 10 --allow-unfunded-recipient
Transferring and viewing tokens can also be done in a web or app based wallet. Phantom seems to be the current recommended wallet app for Solana and its tokens.
For some wallet apps it can be useful to import you private key via QR code, which you can create in the following way:
cat id.json | qrencode -o private_key_dad_qr.png
8. Disable minting & freezing wallets
For a token to have real value there’s a couple of things that need doing, firstly to disable minting, so that ‘printing money’ is prevented (which would devalue the token!), and secondly disable freezing wallets so that the token wallets of others are not under the control of the original creator – only the free market! Please note that these steps are irrevocable:
spl-token authorize mntVoHy1UaF8e3Wkr3yMT2NXx3L4tYnUQARycNDg87H mint --disable
spl-token authorize mntVoHy1UaF8e3Wkr3yMT2NXx3L4tYnUQARycNDg87H freeze --disable
Freezing is disabled by default and shouldn’t be needed!
9. Add Liquidity
The final step to make the token tradable on the open market with a valid price is to add liquidity. This means pairing the token with Solana so its value can be determined, and releasing the tokens into a pool to be traded by others. In return, liquidity tokens (or a position NFT) is provided, which can be withdrawn at a later stage – however, in this case to increase trust, this tokens can be burned too so the liquidity can never be withdrawn.
First step is to create yet another keypair, which is a standard Solana account which can hold our tokens to provide to the liquidity pool:
solana-keygen grind --starts-with LP:1
Public key: LPyvoeUhppZgBYQ9aFKGrzJNB3D3gSDJnC2KVvtGDAN
Then transfer most of the tokens from our original mint account to this new account for the liquidity pool:
spl-token transfer mntVoHy1UaF8e3Wkr3yMT2NXx3L4tYnUQARycNDg87H 990000 LPyvoeUhppZgBYQ9aFKGrzJNB3D3gSDJnC2KVvtGDAN --fund-recipient --allow-unfunded-recipient
This gives a token account inside the Solana account, public key: GjqxumSQ9F15FMyScoC6UutZoCMoTqp1GFDSzNFEe43X
Now these 990,000 AndyPi coins can be paired with Solana in a liquidity pool to set the initial price. Currently the owner of these tokens LPyvoeUhppZgBYQ9aFKGrzJNB3D3gSDJnC2KVvtGDAN has no Solana, so Solana must be added to this account as well to be able to burn the tokens (for the network transaction fee) and also to pair in the liquidity pool. I’ll add 0.5 Solana or around £50GBP at todays prices.
So… that makes 1 AndyPi Coin worth: 0.5/990,000 = 0.000000505 Solana or at todays rate £0.00005757 … a bit ridiculous. So – I decided to burn 980,000 tokens to leave 10,000 tokens, and 0.5/10,000 = 0.00005 Solana or £0.0057 (half a penny). That’s a bit more reasonable. Note that burning tokens is irrevocable!
spl-token burn GjqxumSQ9F15FMyScoC6UutZoCMoTqp1GFDSzNFEe43X 980000 --owner LPyvoeUhppZgBYQ9aFKGrzJNB3D3gSDJnC2KVvtGDAN.json
Now there are 10,000 tokens in a separate account everything is ready to add them to a liquidity pool, to do so use a decentralized exchange (DEX) that has such a feature. Raydium.io and Orca.so are the ones I’ve heard of, and it seems like Orca.so is easier for this use case. There is no user account on these exchange websites – your Solana account IS your identity, however, the way you connect it to Orca or Raydium is via a wallet, of which there are various options such as:
- Phantom
- Solflare
- Backpack
- Slope
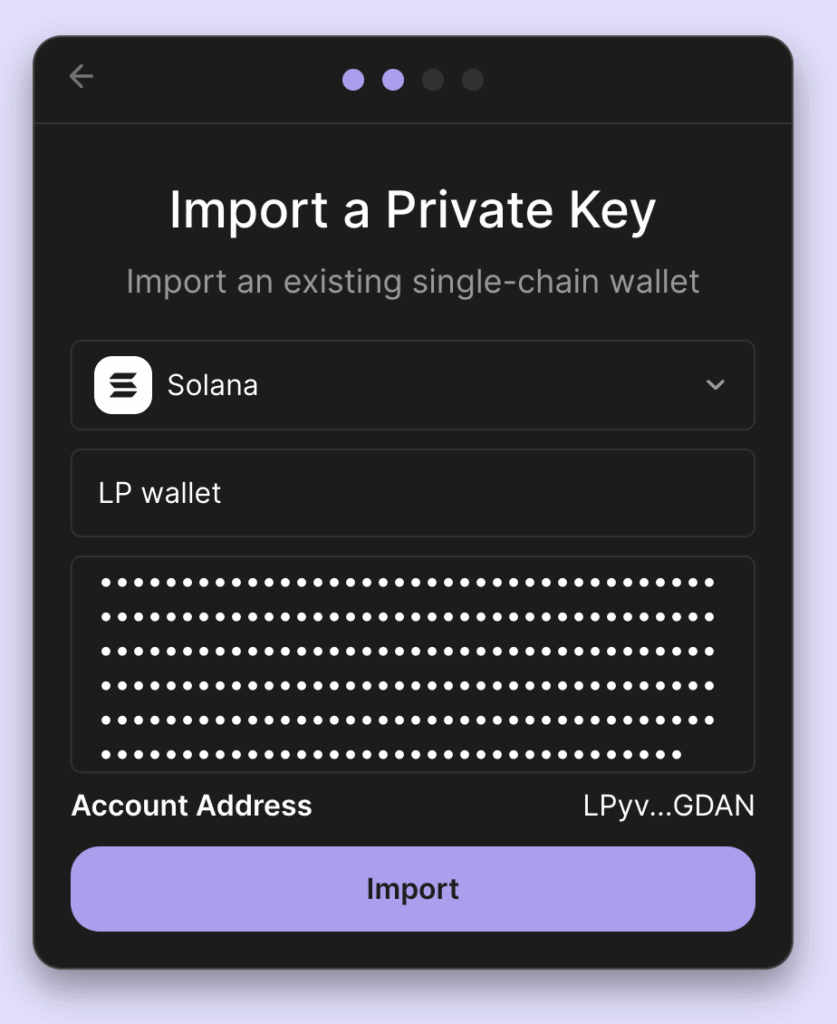
9A. Import Liquidity Account into Phantom Wallet
Using Phantom.app, firstly we need to download & install the browser extension (Chrome in this case):
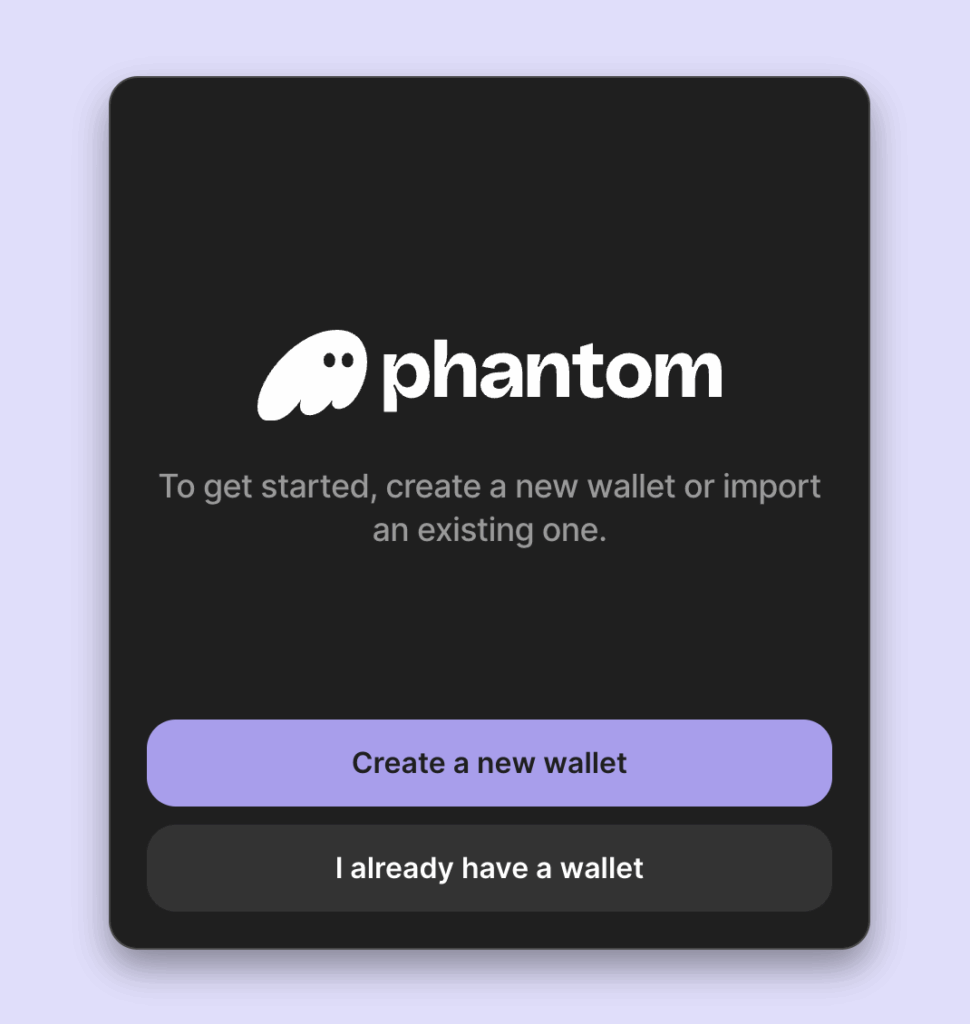
Click ‘ I already have a wallet’
Then click ‘Import Private Key’. Our private key is the json contents of our Solana account: LPyvoeUhppZgBYQ9aFKGrzJNB3D3gSDJnC2KVvtGDAN, the long string of numbers enclosed by [].
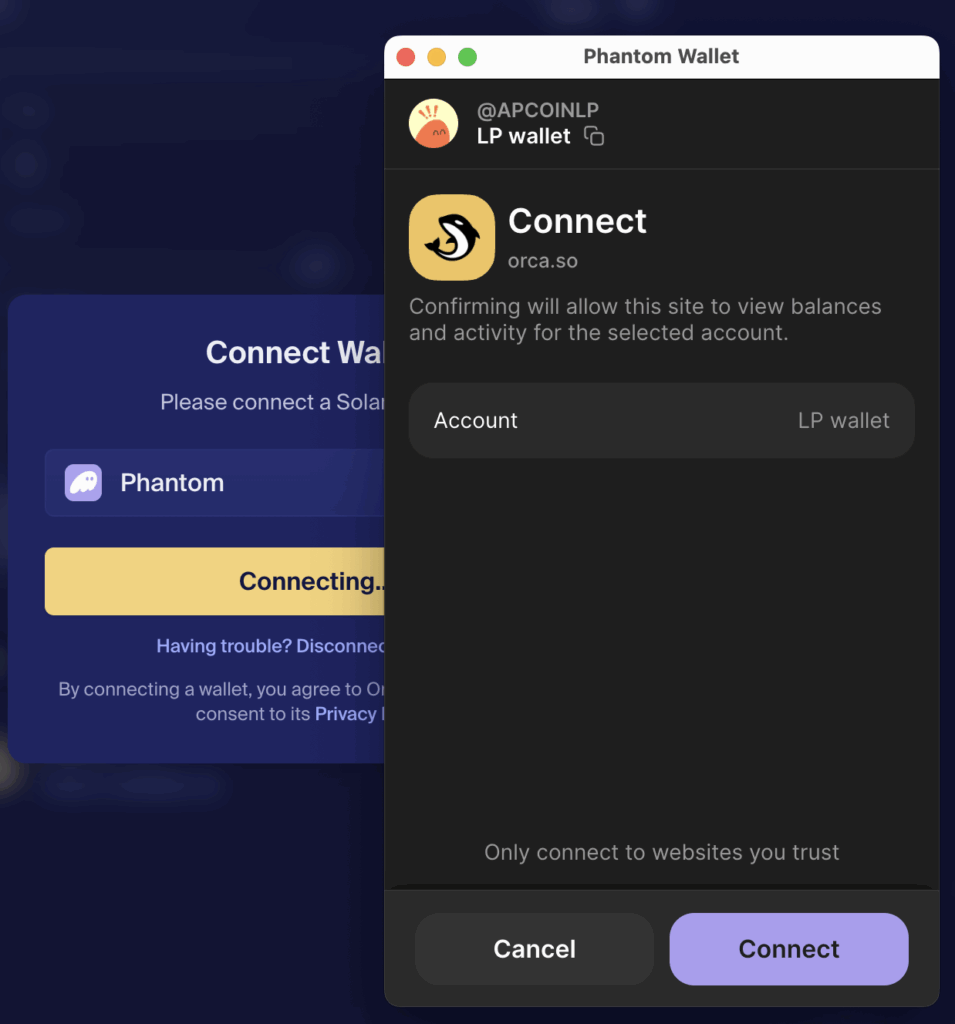
Finally connect Orca (https://www.orca.so) to this wallet (you might need to restart your browser).
9B. Create Pool
Orca top menu > Pools > Create Pool > Splash Pool
Select Solana as the the first token, and paste the mint account address for the Andypi Coin as the second:
mntVoHy1UaF8e3Wkr3yMT2NXx3L4tYnUQARycNDg87H
– note this is NOT the wallet address but the token mint account or definition address.
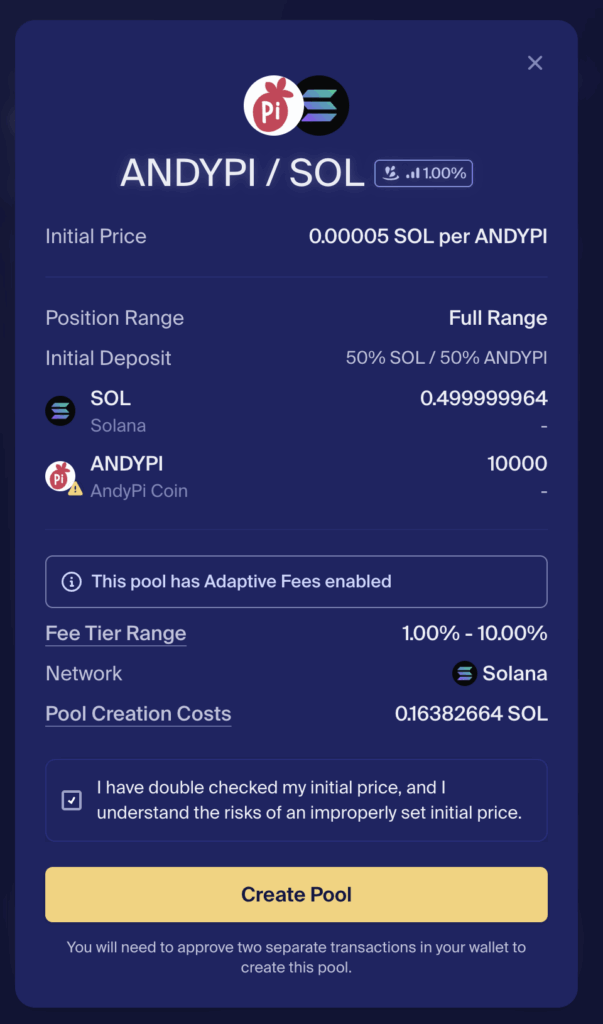
Create Pool, and then confirm the transfer of the tokens:
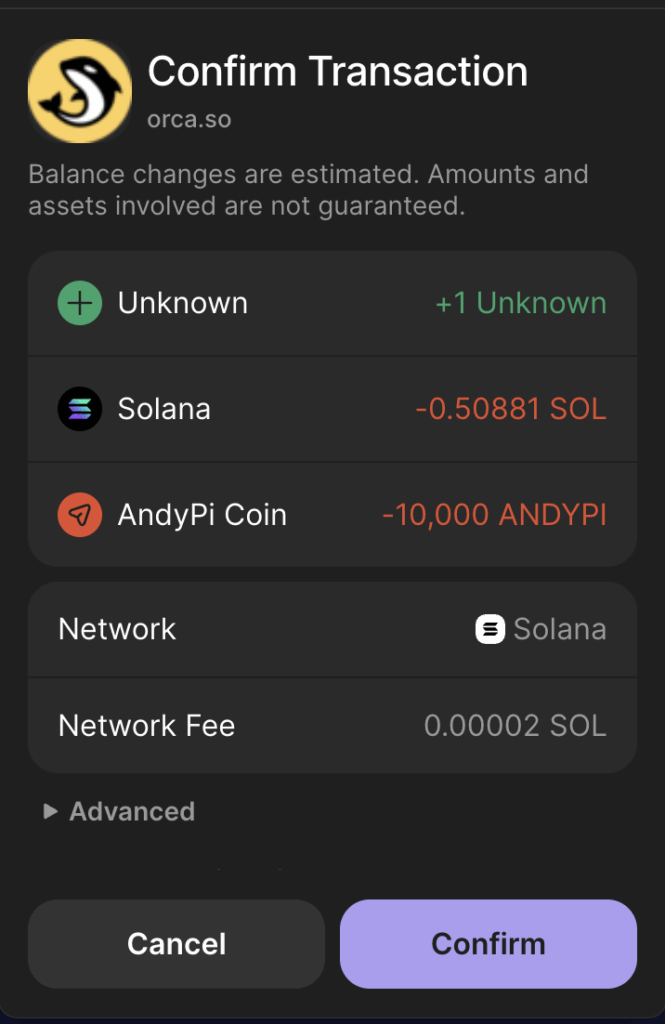
Done! The AndyPi coin is now ready to buy – from the Phantom or other wallets – at the moment it’s not possible to search by name, so you must paste in the mint address / token definition address:
mntVoHy1UaF8e3Wkr3yMT2NXx3L4tYnUQARycNDg87H
Important details are returned as part of this transaction:
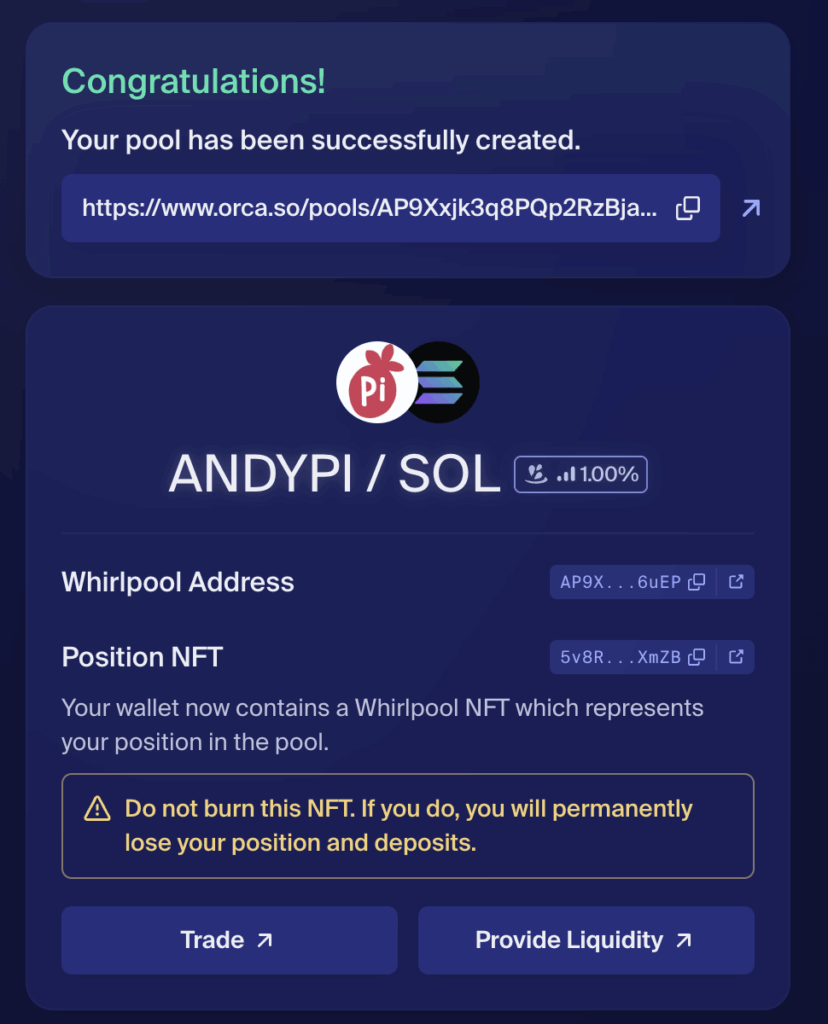
a) The whirlpool address:
AP9Xxjk3q8PQp2RzBjanJhr3PR7pbm3sBucqK9Sd6uEP
This is basically the pool address on Orca which at which the price can be viewed and more liquidity added (https://www.orca.so/pools/AP9Xxjk3q8PQp2RzBjanJhr3PR7pbm3sBucqK9Sd6uEP)
b) The position NFT:
5v8RbnhGxXEbxVg3Ksf6Q234Vvk3bj2YzV9R7NgfXmZB
This like a receipt or ticket that:
- Holds tokens in the pool
- Tracks earnings from swaps (fees)
- Shows the price range chosen
- Allows withdraw of tokens
It can be seen in the ‘Collectibles’ section of the Phantom wallet:

9C. Burn Liquidity Tokens.
In this case, I don’t want the ability to withdrawn tokens at all, since this would mean I can pull all of the liquidity and value of the coin, and everyone’s tokens will become worthless. So to provide some ‘security’ it’s possible to ‘burn’ the position NFT, and lock in the liquidity. This means any Solana that has been paired with the new coin will be locked in forever, and no money can be earned from transaction fees in the liquidity pool.
To burn the position NFT (or the liquidity token) from the command line, check the accounts with the correct wallet (the one which added the liquidity):
spl-token accounts --owner LPyvoeUhppZgBYQ9aFKGrzJNB3D3gSDJnC2KVvtGDAN.json --verbose
The tokens lare isted including the position NFT token, and it’s associated account with a balance of 1:
Program: TokenzQdBNbLqP5VEhdkAS6EPFLC1PHnBqCXEpPxuEb
Token: 5v8RbnhGxXEbxVg3Ksf6Q234Vvk3bj2YzV9R7NgfXmZB
Account: Fwkp6XQkT2Azv9B4D54mKNfPimzZTSY7GkoxwD7HZZeY
Balance: 1                                1
To burn, specify the account not the token itself, making sure to choose the owner (the liquidity wallet):
spl-token burn Fwkp6XQkT2Azv9B4D54mKNfPimzZTSY7GkoxwD7HZZeY 1 --owner LPyvoeUhppZgBYQ9aFKGrzJNB3D3gSDJnC2KVvtGDAN.json
The tokens added to the liquidity pool can never be withdrawn, and the price is now determined by the market!