
PART 1: Deployment Choices
PART 2: Setting Up Django Cheat Sheet
PART 3: Deployment using Ansible and Pyenv
PART 4: Alternative – Deployment of a Django app on Caddy server using Ansible & Docker (this post)
Introduction
This tutorial will demonstrate the steps to reliably and repeatably deploy a Django app in production. By the end, you’ll have a production-ready Django stack running behind Caddy with HTTPS, deployed to a remote server using a single Ansible command. There are several improvements and simplifications in this method compared to part 3 in the series, which include:
-
Docker-first deployment – Develop and run the same containerized stack locally and in production – faster to setup & debug.
-
Gunicorn instead of uWSGI – Simple, config-free, and just works.
-
Caddy instead of Nginx – Minimal configuration, automatic HTTPS with Let’s Encrypt (no messing about trying to automate this with Ansible).
-
Single Ansible playbook – All deployment steps in one file—no juggling roles and templates.
-
uv instead of pyenv – Faster Python installs without extra venv overhead.
-
Hardcoded values for simplicity – Fewer variables to manage; just edit domain, repo, and project names directly.
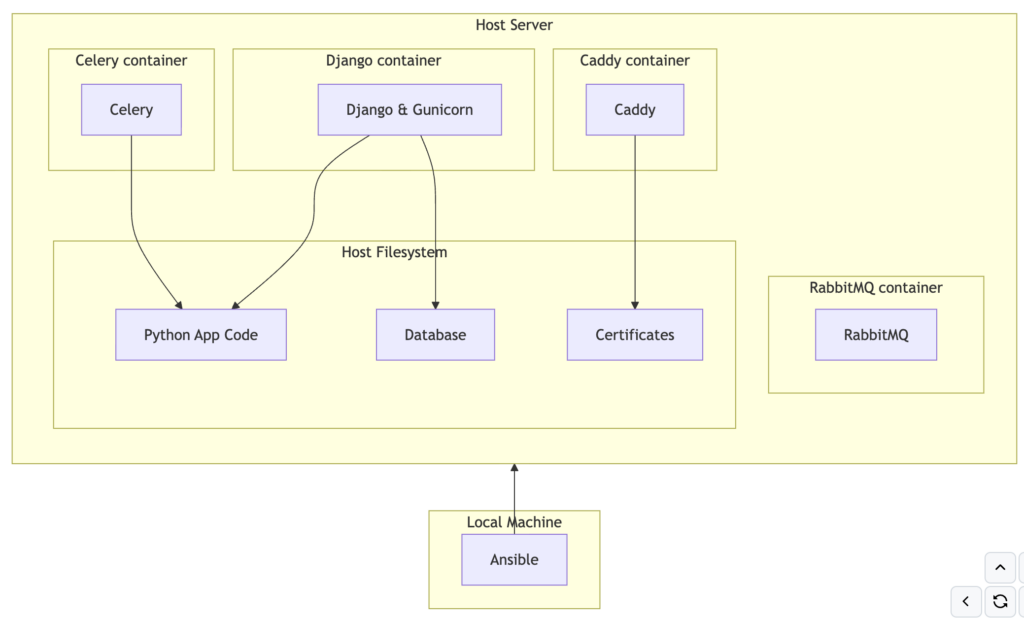
The software stack will look something like this in diagrammatic form:
Step 1. Prepare your Django app (or other python web framework)
This tutorial assumes:
-
You’re on macOS (Linux/Windows users can still follow along with small adjustments)
-
You’re comfortable running basic Docker, Git, and Python commands.
- You can set up your own SSH key access to a VPS.
-
There are three ways to use this tutorial:
- 1. Follow along manually creating each file, starting with following instructions PART 2: Setting Up Django Cheat Sheet – and see notes below about uv
-
2. Use an existing Django app and start from step 2 below
-
3. Clone my example repo, and find and replace ‘projectname’ with your project name, and ‘appname’ with your app name
-
Note this will work with other python web frameworks such as FastAPI or Flask with some minor changes.
In general I’m using uv for most of my newer projects, however I don’t think there is a big enough benefit of using uv inside docker as there is already an isolated environment. However, if you are following my Django Cheat Sheet to create the Django boilerplate you can use uv in the following way:
uv init # start uv project
uv add django gunicorn celery python-dotenv # add packages to uv env
uv export --format requirements-txt -o requirements.txt # export packages that can be used by pip in docker
uv run --with-requirements requirements.txt python django-admin startproject djangodockerdemo # run locally to create boilerplate outside of docker
uv run --with-requirements requirements.txt python manage.py startapp appname
uv run --with-requirements requirements.txt python manage.py runserver # test locally outside of docker
# This file was autogenerated by uv via the following command:
#    uv export --format requirements-txt -o requirements.txt
amqp==5.3.1 \
    --hash=sha256:43b3319e1b4e7d1251833a93d672b4af1e40f3d632d479b98661a95f117880a2 \
    --hash=sha256:cddc00c725449522023bad949f70fff7b48f0b1ade74d170a6f10ab044739432
    # via kombu
asgiref==3.11.1 \
    --hash=sha256:5f184dc43b7e763efe848065441eac62229c9f7b0475f41f80e207a114eda4ce \
    --hash=sha256:e8667a091e69529631969fd45dc268fa79b99c92c5fcdda727757e52146ec133
    # via django
billiard==4.2.4 \
    --hash=sha256:525b42bdec68d2b983347ac312f892db930858495db601b5836ac24e6477cde5 \
    --hash=sha256:55f542c371209e03cd5862299b74e52e4fbcba8250ba611ad94276b369b6a85f
    # via celery
celery==5.6.3 \
    --hash=sha256:0808f42f80909c4d5833202360ffafb2a4f83f4d8e23e1285d926610e9a7afa6 \
    --hash=sha256:177006bd2054b882e9f01be59abd8529e88879ef50d7918a7050c5a9f4e12912
    # via djangodockerdemo
click==8.3.3 \
    --hash=sha256:398329ad4837b2ff7cbe1dd166a4c0f8900c3ca3a218de04466f38f6497f18a2 \
    --hash=sha256:a2bf429bb3033c89fa4936ffb35d5cb471e3719e1f3c8a7c3fff0b8314305613
    # via
    #   celery
    #   click-didyoumean
    #   click-plugins
    #   click-repl
click-didyoumean==0.3.1 \
    --hash=sha256:4f82fdff0dbe64ef8ab2279bd6aa3f6a99c3b28c05aa09cbfc07c9d7fbb5a463 \
    --hash=sha256:5c4bb6007cfea5f2fd6583a2fb6701a22a41eb98957e63d0fac41c10e7c3117c
    # via celery
click-plugins==1.1.1.2 \
    --hash=sha256:008d65743833ffc1f5417bf0e78e8d2c23aab04d9745ba817bd3e71b0feb6aa6 \
    --hash=sha256:d7af3984a99d243c131aa1a828331e7630f4a88a9741fd05c927b204bcf92261
    # via celery
click-repl==0.3.0 \
    --hash=sha256:17849c23dba3d667247dc4defe1757fff98694e90fe37474f3feebb69ced26a9 \
    --hash=sha256:fb7e06deb8da8de86180a33a9da97ac316751c094c6899382da7feeeeb51b812
    # via celery
colorama==0.4.6 ; sys_platform == 'win32' \
    --hash=sha256:08695f5cb7ed6e0531a20572697297273c47b8cae5a63ffc6d6ed5c201be6e44 \
    --hash=sha256:4f1d9991f5acc0ca119f9d443620b77f9d6b33703e51011c16baf57afb285fc6
    # via click
django==6.0.4 \
    --hash=sha256:14359c809fc16e8f81fd2b59d7d348e4d2d799da6840b10522b6edf7b8afc1da \
    --hash=sha256:8cfa2572b3f2768b2e84983cf3c4811877a01edb64e817986ec5d60751c113ac
    # via djangodockerdemo
gunicorn==25.3.0 \
    --hash=sha256:cacea387dab08cd6776501621c295a904fe8e3b7aae9a1a3cbb26f4e7ed54660 \
    --hash=sha256:f74e1b2f9f76f6cd1ca01198968bd2dd65830edc24b6e8e4d78de8320e2fe889
    # via djangodockerdemo
kombu==5.6.2 \
    --hash=sha256:8060497058066c6f5aed7c26d7cd0d3b574990b09de842a8c5aaed0b92cc5a55 \
    --hash=sha256:efcfc559da324d41d61ca311b0c64965ea35b4c55cc04ee36e55386145dace93
    # via celery
packaging==26.2 \
    --hash=sha256:5fc45236b9446107ff2415ce77c807cee2862cb6fac22b8a73826d0693b0980e \
    --hash=sha256:ff452ff5a3e828ce110190feff1178bb1f2ea2281fa2075aadb987c2fb221661
    # via
    #   gunicorn
    #   kombu
prompt-toolkit==3.0.52 \
    --hash=sha256:28cde192929c8e7321de85de1ddbe736f1375148b02f2e17edd840042b1be855 \
    --hash=sha256:9aac639a3bbd33284347de5ad8d68ecc044b91a762dc39b7c21095fcd6a19955
    # via click-repl
python-dateutil==2.9.0.post0 \
    --hash=sha256:37dd54208da7e1cd875388217d5e00ebd4179249f90fb72437e91a35459a0ad3 \
    --hash=sha256:a8b2bc7bffae282281c8140a97d3aa9c14da0b136dfe83f850eea9a5f7470427
    # via celery
python-dotenv==1.2.2 \
    --hash=sha256:1d8214789a24de455a8b8bd8ae6fe3c6b69a5e3d64aa8a8e5d68e694bbcb285a \
    --hash=sha256:2c371a91fbd7ba082c2c1dc1f8bf89ca22564a087c2c287cd9b662adde799cf3
    # via djangodockerdemo
six==1.17.0 \
    --hash=sha256:4721f391ed90541fddacab5acf947aa0d3dc7d27b2e1e8eda2be8970586c3274 \
    --hash=sha256:ff70335d468e7eb6ec65b95b99d3a2836546063f63acc5171de367e834932a81
    # via python-dateutil
sqlparse==0.5.5 \
    --hash=sha256:12a08b3bf3eec877c519589833aed092e2444e68240a3577e8e26148acc7b1ba \
    --hash=sha256:e20d4a9b0b8585fdf63b10d30066c7c94c5d7a7ec47c889a2d83a3caa93ff28e
    # via django
tzdata==2026.2 \
    --hash=sha256:9173fde7d80d9018e02a662e168e5a2d04f87c41ea174b139fbef642eda62d10 \
    --hash=sha256:bbe9af844f658da81a5f95019480da3a89415801f6cc966806612cc7169bffe7
    # via
    #   django
    #   kombu
    #   tzlocal
tzlocal==5.3.1 \
    --hash=sha256:cceffc7edecefea1f595541dbd6e990cb1ea3d19bf01b2809f362a03dd7921fd \
    --hash=sha256:eb1a66c3ef5847adf7a834f1be0800581b683b5608e74f86ecbcef8ab91bb85d
    # via celery
vine==5.1.0 \
    --hash=sha256:40fdf3c48b2cfe1c38a49e9ae2da6fda88e4794c810050a728bd7413811fb1dc \
    --hash=sha256:8b62e981d35c41049211cf62a0a1242d8c1ee9bd15bb196ce38aefd6799e61e0
    # via
    #   amqp
    #   celery
    #   kombu
wcwidth==0.7.0 \
    --hash=sha256:5d69154c429a82910e241c738cd0e2976fac8a2dd47a1a805f4afed1c0f136f2 \
    --hash=sha256:90e3a7ea092341c44b99562e75d09e4d5160fe7a3974c6fb842a101a95e7eed0
    # via prompt-toolkit
Step 2. Containerize with Docker & Docker Compose
Docker files are used to create an isolated container environment, and since several services are required for django project, docker compose can be used to run multiple independent containers but defined in one place. If you haven’t used it before, download and install the Docker engine for your local development machine from: https://www.docker.com/ The containers for this example project seen in docker-compose.yml are:
- Django python app – using a simple dockerfile with the latest version of python, and installs any system dependencies and python packages listed in requirements.txt. Docker compose starts this container with a command to run Django via gunicorn (Gunicorn is a multi threaded server than sits between python and the web server to pass web request data back and forth)
- Celery python container for long running tasks (outside of the web request cycle so) – uses the same dockerfile as for Django, but the entry command starts the celery worker rather than the Django app
- RabbitMQ message queue for handling tasks for celery – use the pre-built container image and the standard port
- Caddy server- use the pre-built container image.
The ‘volumes‘ in docker-compose mount specific folders or files from the host into the container. In this example:
- Django and container, just mount the code repo itself.
- Caddy container:
- Caddyfile of the repo (the Caddy configuration file)
- static folder of the repo, so Caddy can serve static files directly rather than via Django
- caddy_data – Docker automatically creates a named folders on the host machine – caddy’s data folder needs to be outside of the container since this is where it will store the Let’s Encrypt SSL certificates, which are requested automatically but with a limit of X per week, so this needs to be persisted across container restarts!
- Rabbitmq container
services:
  django:
    build: .
    volumes:
    - .:/djangodockerdemo
    working_dir: /djangodockerdemo
    command: gunicorn projectname.wsgi:application --bind 0.0.0.0:8000 # not asgi not async
    restart: unless-stopped
    networks:
      - webnet

  celery:
    build: .
    command: celery -A projectname worker --loglevel=info
    volumes:
      - .:/djangodockerdemo
    depends_on:
      - rabbitmq
    restart: unless-stopped
    networks:
      - webnet

  rabbitmq:
    image: rabbitmq:3-management
    ports:
      - "5672:5672"
      - "15672:15672"
    volumes:
      - rabbitmq_data:/var/lib/rabbitmq
    restart: unless-stopped
    networks:
      - webnet

  caddy:
    image: caddy:latest
    ports:
      - "80:80"
    volumes:
      - ./Caddyfile:/etc/caddy/Caddyfile
      - ./static:/static
      - caddy_data:/data
    depends_on:
      - django
    restart: unless-stopped
    networks:
      - webnet

networks:
  webnet:

volumes:
  rabbitmq_data:
  caddy_data:
caddy_config:FROM python:3.14.4-bookworm
RUN apt-get update && \
apt-get install -y libgdal-dev gcc build-essential make ffmpeg nano && \
apt-get clean && \
rm -rf /var/lib/apt/lists/*
WORKDIR /djangodockerdemo
COPY requirements.txt /djangodockerdemo/requirements.txt
RUN pip3 install -r /djangodockerdemo/requirements.txt
Step 3. Configure Caddy Server
Caddy server setup is straightforward for a single Django project with docker – just a single ‘Caddyfile’ for configuration with only the requirement to specify the domain and the link to Django:
example.com {
    reverse_proxy django:8000
}
For production, there’s a few other things that can be added:
- serving static files directly
- gzip compression
- security hardening
- :80 is localhost on port 80 for development – this needs changing to a domain name for production
:80 {
    reverse_proxy django:8000

    log {
        output stdout
        format json
    }

    encode gzip

    handle_path /static/* {
        root * /static
        file_server
    }

    header {
        Strict-Transport-Security "max-age=63072000; includeSubDomains; preload"
        X-Content-Type-Options "nosniff"
        Referrer-Policy "no-referrer"
    }
}
Step 4. Automate Deployment with Ansible
The setup of the services, python packages is already done with docker, however, a short Ansible playbook is still required to deploy this to a remote virtual server. The playbook does the following steps:
- Installs docker
- Sets the firewall using UFW
- Copies the git repo from your local machine to the server
- NOTE 1: this includes the sqlite database – this needs to be excluded for production and a backup system / different database put in place
- NOTE 2: the git repo includes .env as an example – this should be .gitignored as you will need to add you passwords and API keys in here
- Starts the docker stack
---
- hosts: all
  remote_user: root
  become: yes
  vars:
    PROJECT_ROOT: /app
    PROJECT_NAME: djangodockerdemo
    DOMAINS: example.com,www.example.com

  tasks:

    - name: Add Docker GPG key
      apt_key:
        url: https://download.docker.com/linux/ubuntu/gpg
        state: present

    - name: Add Docker repository
      apt_repository:
        repo: "deb [arch=arm64] https://download.docker.com/linux/ubuntu focal stable"
        state: present

    - name: Install required system packages
      apt:
        name: "{{ item }}"
        state: latest
        update_cache: no
      loop:
        - apt-transport-https
        - ca-certificates
        - curl
        - software-properties-common
        - docker-compose
        - docker-ce

    - name: Set default firewall policy to deny all
      become: True
      ufw: direction=incoming policy=deny
      tags: firewall

    - name: enable SSH in firewall
      ufw: rule=allow port=22
      become: true

    - name: enable HTTP connections for web server
      ufw: rule=allow port=80
      become: true

    - name: enable HTTPS connections for web server
      ufw: rule=allow port=443
      become: true

    - name: enable firewall
      ufw: state=enabled
      become: true

    - name: Create /app directory
      file:
        path: "{{ PROJECT_ROOT }}"
        state: directory

    - name: Copy all project files (note this will obliterate databases)
      synchronize:
        src: .
        dest: "{{ PROJECT_ROOT }}/"
        delete: yes
        recursive: yes

    - name: Set DEBUG to False in .env
      lineinfile:
        path: "{{ PROJECT_ROOT }}/{{ PROJECT_NAME }}/.env"
        regexp: '^DEBUG='
        line: 'DEBUG=False'
        state: present

    - name: Start Docker daemon
      service:
        name: docker
        state: started
        enabled: yes

    - name: Docker Compose Down (needs to restart!)
      command: docker compose down
      args:
        chdir: "{{ PROJECT_ROOT }}/{{ PROJECT_NAME }}/"


    - name: Start Docker Compose services
      command: docker compose -f docker-compose.yml up -d --build
      args:
        chdir: "{{ PROJECT_ROOT }}/{{ PROJECT_NAME }}/"
Step 5. Test Locally & Debug
A) Clone the repo from github:
git clone https://github.com/andy-pi/djangodockerdemo.git
B) Install docker desktop (download from https://www.docker.com/) and uv for python (https://docs.astral.sh/uv/getting-started/installation/)
C) Build the docker containers and run in the background (remove the -d option to see the logs, use Ctrl-C to exit)
docker compose up -d --build
D) List the running containers & their names
docker ps
E) Enter the running docker container (if you need to do debugging / testing)
docker exec -it /bin/bash
F) To stop the running docker stack:
docker compose down
G) View in your browser at:
localhost
Step 6. Go Live in Production
A) Setup a VPS running Ubuntu (with your SSH key)
B) Point your domain DNS to the Ubuntu server IP address
C) Add your domain name in the following places:
– deploy.yml – domains section at the top (replace example.com)
– Caddyfile – replace :80 with the domain
– projectname/settings.py – add you domain inside the ALLOWED_HOSTS list
D) Add the correct IP address to the command below, and run it to deploy to the server and start the stack.
uv run --with ansible ansible-playbook -i "000.000.000.000," deploy.yml
Conclusion
In this tutorial we achieved the same goal of production deployment of a Django web app but with less code and less to manage than in part 3!
Leave a Reply