In this final part, we’ll complete the gateway by setting up our relay to send an sms by sending an email.
1. Setup DNS and Mailgun
I part 3 we already partially setup mailgun, but now you’ll need to add the MX records to your DNS.
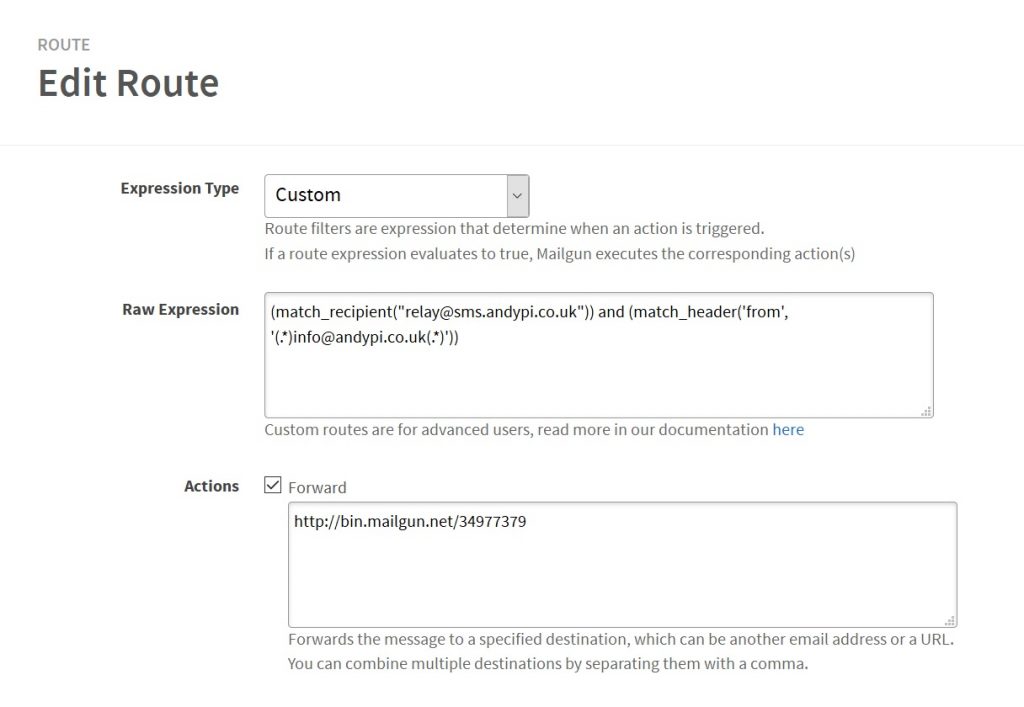
The next thing we need to setup is a Mailgun route to POST an HTTP request to a URL, this will eventually be the url of our raspberry pi, but we can just use one at bin.mailgun.org to test. The route should have a custom expression, to match the recipient (the email address you will send your SMS to), and the from header to match your email address (so that only you can send an SMS, not anyone who sends a message to that address). Note that although this could technically be called a webhook, in Mailgun terms webhooks are only for information about an email, to POST the email itself to an HTTP address we use the routes. Other websites such as sparkpost (more complex) and sendgrid (not free anymore!) will be different:

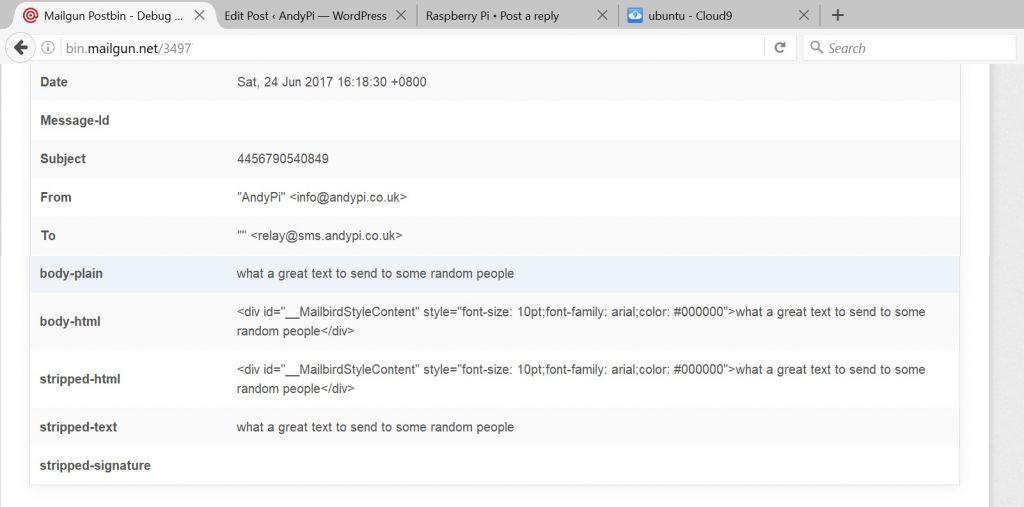
Once the DNS records have propagated, you can send a test email and receive it at your mailgun postbin (bin.mailgun.org/xxxxxxxxx), here is a sample:

In our program we’re going to need to grab the subject (which we will take as the mobile number to send the sms to), and the and the stripped-text which is the plain version of the text sent, which we’ll need to strip down to 160 characters (equivalent length of 1 sms).
2. Python API to receive HTTP POST and send the sms
This is basically a single-endpoint flask restful api web app. The code is all in the github repo (along with the receiving sms python code from part 3). I’m not going to do a breakdown of how this works as I’ve blogged about it before here.
Assuming you’ve already git cloned the repo (you should have done this in part 3), you’ll need to install the python packages. Here were are installing to the root version of python, since the gammu module is installed in this way, so it’s probably not the most secure method.
cd rpi-sms-gateway
sudo easy_install --upgrade pip
sudo pip install -r requirements.txt
sudo nano config.txt
# add the following lines, Ctrl-X and y, enter to save
FLASK_HOST="127.0.0.1" # dataplicity will forward localhost
FLASK_PORT=80
3. Security & web server setup
One of the advantages of using dataplicity is that it gives us a https (secure) connection to the pi without the need for setting up our own SSL certificate, or opening any ports on the pi or your home route to the outside world. But we’ll still add a firewall and disable incoming connections for security, except ssh (but ssh access will only be available on your internal home network, since we aren’t port forwarding from the router)
sudo apt-get install ufw
sudo ufw default deny incoming
sudo ufw default allow outgoing
sudo ufw allow ssh
sudo ufw enable
The built in Flask server than you can use for testing is not designed for production / normal usage. It would be better to use Nginx and uwsgi like this, but the configuration is not that simple and I couldn’t seem to get it to work – perhaps an interference because of dataplicity. Dataplicity have a tutorial on flask apis which runs flask as the server, but use at your own risk!
You can now activate the wormhole on the dataplicity web dashboard, and navigate to the address. Next, change your mailgun forwarding address to this url (replacing the temporary bin.mailgun.org/xxxxxxxxx address). The python code runs at /sendsms, so the url will look like:
https://xxxxxxxx.dataplicity.io/sendsms/
We can test it by running, and send a test email to check it works:
sudo python sendsmsapi.py
# Ctrl-C to quit
Finally, we can make it start on reboots by adding the following to the crontab (sudo crontab -e)
@reboot sudo python /home/pi/rpi-sms-gateway/sendsmsapi.py
Conclusion
So that’s the end of the 4 part tutorial – we’ve now got a pi zero with USB mobile modem acting as an SMS gateway, we can send and receive real SMS by email and we can access remotely using dataplicity if we need to apply any updates.
Thinking about updates, this code really needs to validate mobile numbers, perhaps split up large messages into multiple sms’ and also improve security by running the flask app through uwsgi and checking that only mailgun can send us an POST request. It also really could do with some logging and a way to clean up the inbox… enjoy!

Leave a Reply